The post How to search for a domain name that fits my business appeared first on Web Design Company in Ghana.
]]>In this article, we’ll cover how to search for a domain name using GoDaddy’s domain search feature, as well as a few other options for securing a kick-ass name.
How to search for a domain name
You don’t have to play hide-and-seek with your possible domain. Check out GoDaddy’s easy-to-use search feature, and follow these steps to secure your domain today.
-
Visit GoDaddy.com.
-
Enter your domain in the search bar.
-
Add your domain to the cart.
Ready to get started? Make sure you have a list of domains at the ready, and then read on for an in-depth look (with screenshots) at each step, followed by some additional ways covering how to search for a domain name.
1. Visit GoDaddy.com
 Open up your preferred browser and go to GoDaddy.com. Once the home page loads, you’ll see a search bar where you can begin your domain search.
2. Enter your domain in the search bar
Enter your domain name, and click Search. At this point, one of two things will happen. If your domain name is available, great! You’ll be presented with the opportunity to add it to the cart.

If your domain name isn’t available, you’ll be prompted to search for a new domain name or select a different variation. The good news? Even if your domain name is already taken, GoDaddy’s suggestion tool will list new ideas, with different extensions or variations, that you can review. If you like one of the options, great! If not, enter a few of your other domain options into the search bar until you land on one that’s available.
Pro tip: Don’t shy away from different domain extensions. While .com is still one of the most widely registered domain endings, the availability of hundreds of new domain extensions gives you the opportunity to register a domain that perfectly represents who you are and what you do.
Related Articles: Graphic Design Process for New Websites – A Guide for Clients
3. Add your domain to the cart
And now, all you need to do is click Add to Cart, and you’re done! The domain name will be added to your shopping cart. You can either keep shopping for domain names or proceed to checkout. There, you can add additional products, such as domain privacy or a GoCentral Website Builder, to make sure you start off your online venture on the right foot.
To learn more about possible next steps, check out “You’ve registered a domain name. Now what?”
Other ways to search for domain names
Now that you know how to search for a domain name through GoDaddy, there are a few other channels you can use to find the perfect domain for your business.
By extensions
Did you know that there are more than 350 domain extensions available, with even more possibilities on the horizon? Depending on your business, you could find the perfect extension for your niche.
Sell custom teddy bears online? Perhaps CustomBears.shop or CustomBears.store is right up your alley. Search for available extensions by keyword, options available now, categories and more.

At auctions
Whether you’re looking at an expired domain name or simply interested in purchasing a domain someone else already owns, GoDaddy Auctions is a great place to start. Searching for a domain name here is simple. Just enter your keywords or browse the listings to see what’s available.

Afternic
Afternic is a great place for buying and selling domain names. Because sellers can post their domains here and have their listings sent out to more than 100 platforms worldwide, Afternic is a great resource for searching for a new domain. All you have to do is enter your new search idea on the home page, and Afternic will take care of the rest, directing you to a page with available domains for sale.

In conclusion
Now that you know how to search for a domain name, it’s time to get out there and register a domain for your business. Once you do, don’t forget to attach it to a website. Looking for a DIY solution? With GoCentral, you can build a beautiful site in less than an hour with all the bells and whistles needed to be competitive in this online world. Even better? You can try it today for free.
Source: This Article was originally published on Godaddy.
The post How to search for a domain name that fits my business appeared first on Web Design Company in Ghana.
]]>The post Importance of SSL For Secure Web Browsing appeared first on Web Design Company in Ghana.
]]>All of these security breaches have a certain attack vector in common, and that is social engineering – when you’re tricked into clicking on a link you’re not supposed to, and when you open files or applications from dubious sources. It’s an easy mistake to make, especially when the website looks legitimate, but it’s also easy to avoid — if you know what SSL is.
If you think about it, you’ll probably recall that there’s a green padlock icon on your online banking website, and it usually includes the name of your bank. That’s SSL and it’s what will save you from becoming a victim of nefarious hacks.

In this article, I will explain, in layman’s terms, what SSL means, and its importance in today’s everyday computing.
What is SSL, and how does it work?
Let’s start with the basics: SSL stands for Secure Sockets Layer.
SSL is the standard implementation for establishing a secure and encrypted link between two points on the internet — say your computer and a web server.
It has since been updated to SSL/TLS or Secure Sockets Layer/Transport Layer Security, but it is still known simply as SSL for simplicity. It is also the basis for secure HTTP or HTTPS — it is basically a website transported through hypertext transfer protocol that goes through a secure, encrypted connection.
Too much jargon? Let’s simplify it even further, with some analogies.
Suppose you want to open an account with your local bank. You approach the teller, but she does not want to open one for you, since she does not know you (and since your account will be the basis for future transactions). One option is for the bank to call the authorities (the state department for example, or social security, or the department of motor vehicles) since they have your identification.
But that seems to be tedious, so she asks for identification, instead. You provide your passport, which contains your personal details, biometrics, etc. This serves as the document that authenticates your identity. However, the document in itself does nothing exceptional except identify you. You cannot use it to withdraw money from your bank, per se.
However, because your passport is an identifying document issued by a trusted authority (the government, the state department in particular), you can use it to open an account, acquire and ATM card, which you can then use to withdraw from the bank.
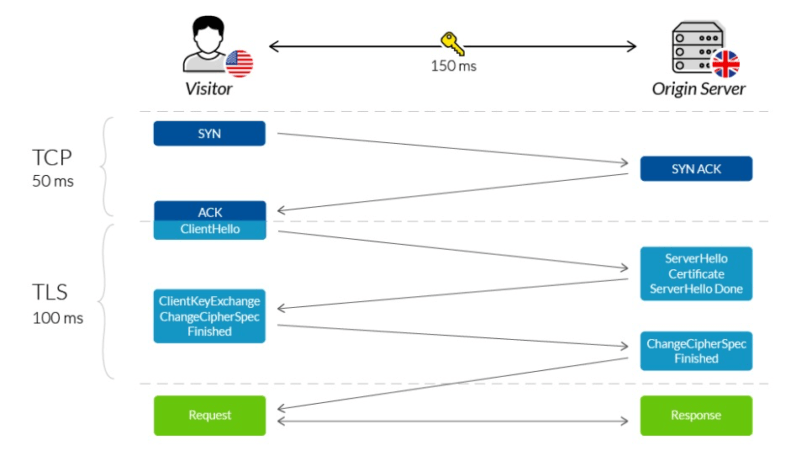
Similarly, the same scenario happens when you are accessing a secure website. Your client seeks authentication and identification from the web server, which it presents through its SSL certificate. The website cannot simply say “I am bank of America” — it needs a trusted certificate provider to establish this identity. This actually takes the form of an SSL handshake, which is a back-and-forth communication to establish a connection and identification before the web browser actually requests the needed information.
Is it that simple, then? Can’t I just acquire a certificate from a cheap provider?
Now, not all SSL certificates and certificate providers are made equal.
Some are enterprise-grade certificates and cost a pretty penny (worth thousands of dollars annually or so), while some are practically free, such as with LetsEncrypt.
An analogy here is that your passport is a secure indication of your citizenship to a country, and it is a trustworthy document that establishes your citizenship and identity. It can even be used to travel to other countries. Note, however, that not all passports are the same. Some are more “powerful” than others, since a bearer can travel to more countries without requiring a visa. For other passport bearers, they are required to secure additional documents (visa or other travel documents) before being granted access to a country.
In the same breath, SSL certificates are different. In the example above, for example, the certificate’s name itself is displayed on the browser, and it is one of the top-tier types of certificates. Most lower-grade certificates only indicate the “Secure” icon, but the certificate owner’s name is not presented.

Granted, not all websites require the security of a bank website.
If you run a small blog, then security is appreciated, but not a deal-breaker. If you run an ecommerce website or a fintech company, however, users are bound to share details like addresses, card numbers, and the like. In this case, it would be necessary to have a top-tier SSL certificate.
SSL certificates come in different grades, as assessed by platforms like ssllabs.com. For example, The Next Web has an A+ certificate.
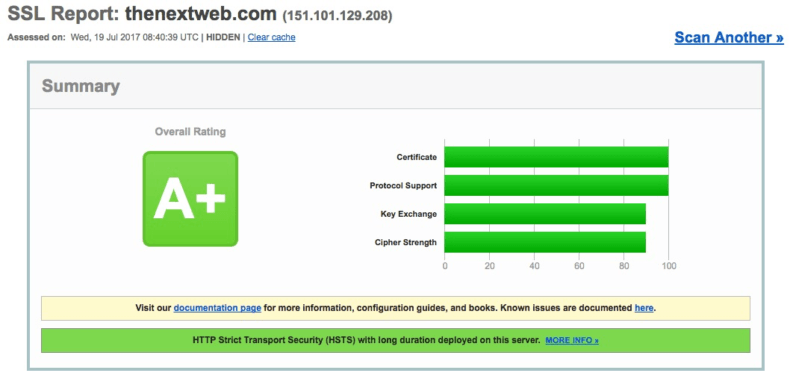
One way of establishing a Grade A+ certificate without spending a lot is by deploying your website or app infrastructure over a content delivery network that itself has a Grade A+ certificate, wherein your website will inherit the CDN’s own SSL certificate grade.
Let’s recap
This does not preclude other potential dangers, such as social engineering attacks, spoofing attacks, and other such attack vectors that can circumvent the security of connections.
To conclude with my earlier analogy, it’s like someone creating a fake ID and pretending to be you while making a transaction at the bank, or someone stealing your ATM or credit card and using it to buy items or withdraw money (with the right PIN).
Still, SSL is certainly the bare minimum of ensuring security of transactions and communications across client and server. No website or application should be without it, and you, as a user, should be wary of sending information across non-secure connections.
Source: This article was formally published on TNW
The post Importance of SSL For Secure Web Browsing appeared first on Web Design Company in Ghana.
]]>The post How to Log in to your WordPress Website Dashboard appeared first on Web Design Company in Ghana.
]]>The admin section of WordPress, the “WordPress Dashboard“, is where you will begin building your WordPress site.
Please take note that your login credentials are not the same as your cPanel username and password unless you set them up as the same. You will need some information to login to WordPress.
- WordPress Installation URL: if you installed WordPress on the root of your domain your URL to access WordPress would be: example.com/wp-admin
- WordPress Username: This is the username you set up when initially installing WordPress. You can also use your email in place of the username.
- WordPress Password: This is the password you set up when installing WordPress. If you emailed the installation details during the installation process it will be in that email as well.
Steps to log into WordPress
- To access the WordPress dashboard you simply need to add /wp-adminto the end of the URL where you installed WordPress like the below example:
example.com/wp-admin
Note! If you installed WordPress to the document root of the url it would be example.com/wp-admin. If you installed WordPress on a folder called “blog” on your domain you would go to example.com/blog/wp-admin
When you visit the login page for WordPress you will see the login screen.
- Type the username and password you used when you installed your WordPress.
Note! Your WordPress login is a different login than your cPanel and your AMP. If you cannot remember your Username or Password, Please see our article on Resetting your WordPress Admin Password
After you login to the dashboard successfully you will see the WordPress dashboard as shown below:

The post How to Log in to your WordPress Website Dashboard appeared first on Web Design Company in Ghana.
]]>The post How To Make WordPress Website Faster With W3 Total Cache + CloudFlare appeared first on Web Design Company in Ghana.
]]>You need a quick-loading website.
Speeding up your website makes your visitors happier, improves the chances they buy from you, and even gets you more of those visitors in the first place!
But even if you know you need a faster website, when terms like caching, minification, and content delivery get thrown into the mix, it can start to feel a little overwhelming, right?
So if you’ve been struggling with the time or technical know-how required to improve your site’s speed, I’ve got the guide for you.
In this guide, I’m going to show you how to drastically slash your WordPress site’s load time without paying a single cent. To do that, you’ll use two free tools: the W3 Total Cache WordPress plugin and a service called CloudFlare.
I’ll take you through every step of the process using real screenshots. So whether you’re a total newbie or an advanced WordPress user, you’ll be able to figure everything out.
Let’s get into it!
How do W3 Total Cache and CloudFlare improve page speed?
Beyond choosing quality hosting, two of the biggest improvements you can make to a WordPress site’s page load times are:
- A good caching plugin
- A content delivery network (CDN)
W3 Total Cache knocks out the caching part. Caching speeds up your site by serving static files instead of dynamically rendered content (which WordPress is full of). I know that sounds a bit jargony, but all it really means is that your web server has to do less work and can, therefore, serve up your content faster.
CloudFlare boosts your site speed by another method: content delivery optimization. Without a CDN, every visitor to your site has to download all of your files from one location – your website’s data center.
Whether they’re located in Paris, Texas or Paris, France, they get your website’s data from the same place. CDNs change that by creating multiple global versions of your data.
Then, visitors can download static files like images and videos from the data center nearest to them, rather than your far-off web server. This physical proximity reduces download times and therefore speeds up your website.
Put W3 Total Cache and CloudFlare together and you’ve got a page load time-slashing super duo.
How to set up and configure W3 Total Cache
You know how most WordPress plugins just let you “activate and go”? Yeah, that’s notthe case with W3 Total Cache. Sorry!
It has a dizzying 13 different menu items…in just the General Settings tab. I know going through everything sounds like a chore, but I promise you that the payoff is worth it.
And I also promise that I’ll use tons of screenshots to make the process as simple as possible. After showing you how to configure W3 Total Cache, I’ll then take you through setting up CloudFlare and making it work together with W3 Total Cache.
Step 1: Install and activate W3 Total Cache
Get started by installing and activating W3 Total Cache. It’s a free plugin available at the wordpress.org plugin directory, so you can install it directly from your WordPress dashboard by going to Plugins → Add New and searching:

Make sure that you activate the plugin. Then, head to its configuration options by clicking on the Performance tab.
Step 2: Configure general settings
The first thing you need to configure is W3 Total Cache’s General Settings. This tab enables/disables all of the features which you’ll configure in greater detail later on:

I’ll go through it in order from top to bottom.
- General
The first option allows you to automatically enable every W3 Total Cache feature. Unfortunately, you won’t need every single feature, so you should not use this option.

It also lets you enable Preview mode. In preview mode, you can test changes before deploying them to your live site. I personally don’t use Preview mode, because it’s easy to just disable the plugin if anything goes awry.
- Page Cache – ENABLE
This is the absolute most important feature of W3 Total Cache. Page Cache alone will massively improve your site’s performance.
Definitely, Enable Page Cache. For the method, you should choose the Disk: Enhancedoption, which should be the default:

- Minify – DISABLE
Minify can shrink your site’s code without losing any of its functionality. You definitely want to minify your code for improved page load times. BUT, CloudFlare also supports minification. So I will actually recommend using CloudFlare to minify your code instead.
Therefore, do not enable Minify in W3 Total Cache if you’re planning to follow this full tutorial and use CloudFlare.

- Database Cache – DISABLE
Your database is where all of the actual data for your posts, pages, and everything else is stored. Database Cache can improve your database’s performance and reduce the time it takes to create posts, pages, and RSS feeds.
But if you’re on shared hosting, database caching can actually slow down your site by offloading too much work to your server’s CPU.
So if you’re on budget shared hosting, I recommend leaving Database Cache Disabled. If you have a dedicated server or VPS, you can enable it.

- Object Cache – ENABLE
Object Cache is another one that may or may not play well with shared hosting. It’s worth trying, but if you ever notice that your WordPress admin dashboard is running slowly, you may want to go back and disable this at a later date.
But for now, Enable Object Cache and choose the Disk method:

- Browser Cache – ENABLE
Browser Cache speeds up your site by caching static resources in your visitors’ browsers, thereby eliminating the need to constantly reload static content.
You definitely want to Enable this option:

- CDN – DISABLE
While you will be using a CDN (CloudFlare), this is not where you will configure it. So leave CDN Disabled. Don’t worry – I’ll show you how to handle CloudFlare later on.

- Reverse Proxy – DISABLE
Reverse proxies are an advanced concept that generally require private hosting. Therefore, you can leave this one Disabled.

- Monitoring – NO ACTION
You don’t need to configure Monitoring. Just ignore it.

- Debug – DISABLED
Unless you’re actively trying to debug your site, you should leave all of the Debug options Disabled. They’ll only add unnecessary code to your site.

And that’s it for configuring General Settings! There may be a few additional options thrown in, but you can safely ignore anything that I didn’t mention above.
Next, you’ll need to configure each method in more detail. You can access each method’s detailed settings by clicking on the relevant option in the menu of your sidebar:

Remember – you only need to configure the options which you enabled above. So you won’t need to configure every menu item.
Step 4: Configure page cache
First, go to the Page Cache settings. Then, go through the different options on the page following these instructions. If I don’t mention a section, you can leave it as the default.
- General
Under General, make sure you check these boxes to enable them:
- Cache front page
- Cache feeds
- Cache SSL – CloudFlare offers free SSL certificates, so you can enable this box even if you’re not currently using SSL.
- Don’t cache pages for logged in users
You can leave everything else disabled (unchecked):

- Cache Preload
Fill in this section following these settings:
- Automatically prime the page cache: Checked
- Update interval: 900 seconds
- Pages per interval: 10
- Sitemap URL: The actual link to your sitemap if you have one. Typically “yourdomain.com/sitemap.xml” for most SEO plugins.
- Preload the post cache upon publish events: Checked

You can safely leave everything else in this section as the default.
Step 5: Configure object cache
Because neither Minify nor Database Cache should be enabled, you can skip straight to the Object Cache settings.
You should be able to leave everything as the default here – just make sure that you see these numbers:
- Default lifetime of cache objects: 180 seconds
- Garbage collection interval: 3600 seconds

Step 6: Configure browser cache
This is the last method you need to configure!
- General
Under the General options, you need to check some additional boxes. Make sure to check all of these:
- Set Last-Modified header: Checked
- Set expires header: Checked
- Set cache control header: Checked
- Set entity tag (eTag): Checked
- Set W3 Total Cache header: Checked
- Enable HTTP (gzip) compression: Checked
You can leave any other options unchecked:

You can leave all of the other sections under Browser Cache as their defaults.
Step 7: Configure W3 Total Cache CloudFlare Extension
That’s it as far as configuring settings goes! For now, the last thing you need to do in W3 Total Cache is go to the Extensions page and Activate CloudFlare.

After you configure CloudFlare, you’ll need to come back to this page to enter your CloudFlare login credentials.
For now, you’re ready to move on to configuring CloudFlare.
How to set up and configure CloudFlare for WordPress
I’ve got great news…
If you made it through the W3 Total Cache configuration section, CloudFlare is going to seem like an absolute walk in the park in comparison.
Grab a fresh cup of coffee and let’s keep going.
Step 1: Sign up for a CloudFlare account and select your website
Head on over to the CloudFlare website and sign up for an account.
Once you create your account, CloudFlare will ask you to add your website. Just enter your website’s domain and click Scan DNS Records:

CloudFlare will show you a helpful video while it scans your website. Once the scan finishes, just click Continue.
Step 2: Verify your DNS records
On the next screen, you need to verify your DNS records. I know this might seem complicated. But if you’re a beginner, here’s all you need to do:

Make sure you see the orange CloudFlare icon next to your real domain name. This means that CloudFlare will accelerate traffic for that domain. If you’re using any public subdomains, you should also verify that you see an orange icon next to them.
As long as you see the orange icon, you’re set to jet!
Step 3: Choose your plan level
Because this post is all about speeding up your site for free, you should choose the Free plan. For most site owners, the free plan is more than powerful enough.

Step 4: Update your nameservers
In the last step, you’ll need to update your domain’s nameservers from your current nameservers to the new nameservers provided by CloudFlare.
To do that, you’ll need to go to wherever you registered your domain name and update your nameservers with your registrar. If you need help, your registrar’s support team can point you in the right direction.

It might take 24 hours for the changes to take effect. But don’t worry – your site won’t experience any downtime. All that means is CloudFlare might not actually start speeding up your site for 24 hours.
And you’re done with the basic configuration!
Step 5: Activate CloudFlare in W3 Total Cache
Almost there, folks! Just bear with me for another couple minutes.
Now, you just need to go back to W3 Total Cache and add your CloudFlare login credentials to sync the two together.
In your WordPress dashboard, go to Extensions and click the Settings link under the CloudFlare extension.
Click the Authorize button under the Credentials:

Enter the email address for your CloudFlare account as well as your CloudFlare API key.
You can find your CloudFlare API key by going to My Account (this link will take you straight there) and finding the API Key section:

Once you save your credentials, you should see a new screen with a number of settings options.
Step 6: Turn on CloudFlare Minify
Last step, I pinky promise! You just need to scroll down in those settings and enable all three levels of minification:

And that’s it! Save your settings, break out the champagne, and celebrate a job well done.
If you ever need to, you can also configure SSL and security settings on this page. But it’s fine to leave them as the default for now.
Wrapping things up
Phew, I know that was a lot. But once you do this process once, you should be done with it forever! That means an hour or so of pain will set you up for a lifetime of improved page load times. And that’s a guaranteed win as far as ROIs go!
Source: This article was originally published on bloggingwizard.com
The post How To Make WordPress Website Faster With W3 Total Cache + CloudFlare appeared first on Web Design Company in Ghana.
]]>The post How to Create Posts (Blog Posts) in WordPress appeared first on Web Design Company in Ghana.
]]>It’s one thing getting your website designed for you. But managing your own website in terms of writing blog posts can be interesting or cumbersome depending on your know-how. This tutorial will help you to publish your own posts without difficulty and do so using the best practices.
To write a post or blog post:
- Log in to your WordPress Administration Panel (Dashboard).
- Click the ‘Posts’ tab.
- Click the ‘Add New’ sub-tab.
- Start filling in the blanks: enter your post title in the upper field, and enter your post body content in the main post editing box below it.
- As needed, select a category, add tags, and make other selections from the sections below the post. (Each of these sections is explained below.
- When you are ready, click Publish.
Descriptions of Post Fields

WordPress Admin Writing Post Advanced Panel – Top of Page
- Title/Headline Box
- The title of your post. You can use any phrases, words or characters. Avoid using the same title twice as that will cause problems. You can use commas, apostrophes, quotes, hyphens/dashes and other typical symbols in the post like “My Site – Here’s Lookin’ at You, Kid”. WordPress will then clean it up to generate a user-friendly and URL-valid name of the post (also called the “post slug”) to compose the permalink for the post.
- Body Copy Box
- The blank box where you enter your writing, links, links to images, and any information you want to display on your site. You can use either the Visual or the Text view to compose your posts. For more on the Text view, see the section below, Visual Versus Text View.
- Preview button
- Allows you to view the post before officially publishing it.
- Publish box
- Contains buttons that control the state of your post. The main states are Published, Pending Review and Draft. A Published status means the post has been published live on your blog for all to see. Pending Review means the draft is waiting for review by an editor prior to publication. Draft means the post has not been published and remains a draft for you. If you select a specific publish status and click the update post or “Publish” button, that status is applied to the post. For example, to save a post in the Pending Review status, select Pending Review from the Publish Status drop-down box, and click Save As Pending. (You will see all posts organized by status by going to Administration Panels > Posts > Edit). To schedule a post for publication on a future time or date, click “Edit” in the Publish area next to the words “Publish immediately”. You can also change the publish date to a date in the past to back-date posts. Change the settings to the desired time and date. You must also hit the “Publish” button when you have completed the post to publish at the desired time and date.
- Publish box
- Visibility – This determines how your post appears to the world. Public posts will be visible by all website visitors once published. Password Protected posts are published to all, but visitors must know the password to view the post content. Private posts are visible only to you (and to other editors or admins within your site)
- Permalink
- Permalink stands for “permanent link”. That means a post URL that does not expose the post ID which could be subject to a change (e.g. when moving to different blogging system), but it rather contains a user-friendly post name derived from the post title which could also change, although not recommended, but in a more controllable way. This post name (also referred to as “post slug” or just “slug”) can be edited, depending on your Permalinks settings, using the “Edit” button. (To change your settings, go to Administration Panels > Settings > Permalinks). The permalink is automatically generated based on the title you set to the post and is shown below the title field. Punctuation such as commas, quotes, apostrophes, and invalid URL characters are removed and spaces are substituted with dashes to separate each word. If your title is “My Site – Here’s Lookin’ at You, Kid”, it will be cleaned up to create the slug “my-site-heres-lookin-at-you-kid”. You can manually change this, maybe shortening it to “my-site-lookin-at-you-kid”.
- Save
- Allows you to save your post as a draft / pending review rather than immediately publishing it. To return to your drafts later, visit Posts – Edit in the menu bar, then select your post from the list.
- Publish
- Publishes your post on the site. You can edit the time when the post is published by clicking the Edit link above the “Publish” button and specifying the time you want the post to be published. By default, at the time the post is first auto-saved, that will be the date and time of the post within the database.
- Post Tags
- Refers to micro-categories for your blog, similar to including index entries for a page. Posts with similar tags are linked together when a user clicks one of the tags. Tags have to be enabled with the right code in your theme for them to appear in your post. Add new tags to the post by typing the tag into the box and clicking “Add”.
- Categories
- The general topic the post can be classified in. Generally, bloggers have 7-10 categories for their content. Readers can browse specific categories to see all posts in the category. To add a new category, click the “+Add New Category” link in this section. You can manage your categories by going to Administration Panels > Posts > Categories.
- Excerpt
- A summary or brief teaser of your post featured on the front page of your site as well as on the category, archives, and search non-single post pages. Note that the Excerpt does not usually appear by default. It only appears in your post if you have modified the template file listing the post to use the_excerpt() instead of the_content() to display the Excerpt instead of the full content of a post. If so, WordPress will automatically use as the Excerpt the first 55 words of your post content or the content before the <!--more--> quicktag. If you use the “Excerpt” field when editing the post, this will be used no matter what. For more information, see Excerpt.
- Send Trackbacks
- A way to notify legacy blog systems that you’ve linked to them. If you link other WordPress blogs, they’ll be notified automatically using pingbacks. No other action is necessary. For those blogs that don’t recognize pingbacks, you can send a trackback to the blog by entering the website address(es) in this box, separating each one with a space. See Trackbacks and Pingbacks for more information.
- JobHouse does not advise the use of Trackbacks. They put unnecessary pressure on the website and can lead to many problems.
- Custom Fields
- Custom_Fields offer a way to add information to your site. In conjunction with extra code in your template files or plugins, Custom Fields can modify the way a post is displayed. These are primarily used by plugins, but you can manually edit that information in this section.
- Discussion
- Options to enable interactivity and notification of your posts. This section hosts two check boxes: Allow Comments on this post and Allow trackbacks and pingbacks on this post. If Allowing Comments is unchecked, no one can post comments to this particular post. If Allowing Pings is unchecked, no one can post pingbacks or trackbacks to this particular post.
- Password Protect This Post
- To password protect a post, click Edit next to Visibility in the Publish area to the top right, then click Password Protected, click Ok, and enter a password. Then click OK. Note – Editor and Admin users can see password protected or private posts in the edit view without knowing the password.
- Post Author
- A list of all blog authors you can select from to attribute as the post author. This section only shows if you have multiple users with authoring rights in your blog. To view your list of users, see Users tab on the far right. For more information, see Users and Authors.
- Revisions
- A list of all revisions made to the current post or page. Clicking on a revision will open a dedicated revision change where you can compare the current version of the post or page with any previous versions. There is also an option to restore any previous versions.
Note: You can set basic options for writing, such as the size of the post box, how smiley tags are converted, and other details by going to Administration Panels > Settings > Writing. See Writing Options SubPanel.
Best Practices For Posting / Blog Posting
You can say or show the world anything you like on your WordPress site. Here are some tips you need to know to help you write your posts in WordPress.
- Practice Accessibility
- To be compliant with web standards for accessibility, be sure to include ALT and TITLE descriptions on links and images to help your users, such as <a title="WordPress Codex" href="http://codex.wordpress.org/">WordPress Codex</a>.
- Use Paragraphs
- No one likes to read writing that never pauses for a line break. To break your writing up into paragraphs, use double spaces between your paragraphs. WordPress will automatically detect these and insert <p> HTML paragraph tags into your writing.
- Use Headings
- If you are writing long posts, break up the sections by using headings, small titles to highlight a change of subject. In HTML, headings are set by the use of h1, h2, h3, h4, and so on. By default, most WordPress Themes use the first, second, and sometimes third heading levels within the site. You can use h4 to set your own headings. You can use the Heading 4 style from your editing dropdown menu using the Visual Editor, or you can enter your headline manually in the Text Editor by typing:
- <h4>Subtitle of Section</h4>. To style the heading, add it to your style.css style sheet file. For more information on styling headings, check out Designing Headings.
- Use HTML
- You don’t have to use HTML when writing your posts. WordPress will automatically add it to your site, but if you do want control over different elements like boxes, headings, and other additional containers or elements, use HTML.
- Spell Check and Proof
- There are spell check Plugins available, but even those can’t check for everything. Some serious writers will write their posts in a text editor with spell check, check all the spelling and proof it thoroughly before copying and pasting into WordPress.
- Think before you post
- Ranting on blogs is commonplace today, but take a moment and think about what you are writing. Remember, once it is out there, it can be seen by many and crawled by search engines; and taking things back is harder once it is public. Take a moment to read what you’ve written before hitting the Publish button. When you are ready, share it with the world.
- Write about what you like
- You’ve heard this a thousand times before and it sounds too cliched, but it is true. If you force yourself to write something that you don’t really enjoy, it will show. Perhaps you might not have a specific theme for writing when you just start, but that’s ok. You’ll become more focused later. Just enjoy the experience and write what you like.
- Write frequently
- Write as frequently as you can, but don’t let quantity get in the way of quality. Your viewers come for content, not to spend time reading useless stuff.
- Don’t use too much slang
- Not all the readers will be from your part of the world so make sure people can understand easily.
- Don’t hide your emotions
- Tempting as it might be, don’t hide your real emotions. After all that is what a blog is about. If you want, you can stay anonymous and voice your feelings on whatever you are passionate about. You might have strong views on various subjects but let your readers know your passion. What is passion worth if you can’t even share it? You’ll actually love the discussions it can lead to. The discussions will broaden your own thinking and you might end up making some really good friends.
- Consider your readers
- Perhaps this sounds weird, but consider who needs to know about your blog before you tell them about your new blogging hobby. Will you be able to write freely if you tell them? How much should you let your readers know about you? Is it ok if your boss or girlfriend reads your posts? If you don’t want them to read, take anonymity measures accordingly.
- Make use of comments
- Comments let people share their ideas. Sometimes, they might not be good, but you can ask such people to shut up. Most of the times, they will and if they don’t you can delete their comments. Blogging like real life, can be both fun and not so fun at times. Be prepared. Also, give your people a place to contact you in private if they want to write to you.
- Worry about blog design later
- Blog design matters, but only to an extent. Don’t give up on blogging just because the design isn’t coming up as you’d like it to be. Sooner or later, you’ll get around the design problems with ease. But continue writing. Content is what attracts your readers, not just the look of your blog.
- Don’t play too safe
- Talk about the real you. Readers aren’t impressed by how big your house is, which cool club you belong to, or what the weather is in your hometown. Don’t be a bore and put a long post on how you fixed the leaking tap in minutes. Readers don’t care about braggers, they care about the real you–how you feel, what gets you excited, why you are the person you are. But if achievements are all that you can talk about, you will bore your readers.
- Use pictures and videos
- They make the pages colorful and viewers get to see a little of your part of the world. They feel connected.
- Keep writing
- Don’t stop blogging. If you don’t have anything to write about, chances are, you are still holding back. Let loose. Perhaps surf more blogs and maybe you’ll get an idea. You can write about your friends, complain about your boss, or simply rant about what’s gone wrong. Yet if nothing else works, just write a review on the latest movie, book, or product. Easy actually.
- Save your posts
- Save your posts before you press the publish button. Anything can happen with your computer or with an internet connection. You don’t need to lose your post.
Adapted from: https://codex.wordpress.org/Writing_Posts
The post How to Create Posts (Blog Posts) in WordPress appeared first on Web Design Company in Ghana.
]]>The post Tutorial: How to Create and Manage Products With WooCommerce appeared first on Web Design Company in Ghana.
]]>First, what is WooCommerce? WooCommerce is a free eCommerce plugin that allows you to sell anything online. Built to integrate seamlessly with WordPress platform, WooCommerce is the world’s favorite eCommerce solution that gives both store owners and developers complete control.
Now, log into your dashboard and let’s go!
Adding a Product
Click on Products. This will take you to the page that lists all the products in your shop. At this point it will naturally be empty.

By clicking Add Product at the top or in the menu on the left you can start creating one.
The following screen will look very familiar. It is basically the normal WordPress editor with a number of additional options.

At the top of the screen you can give your product a title and add a description like in a normal post. This includes images and other media. The information here will appear on the main product page.
There are also a few other options that are very similar the ones found for posts and pages:
- Product Categories: Create and assign categories and subcategories to order your products and make them easier to browse.
- Product Tags: Distinguish products even further with tags.
- Product Image: Works like a featured image. Whatever you upload here will automatically be spit out on the product and shop page.
- Product Gallery: In addition to the product image you can also add an image gallery, for example to show different product variations, different angles and more.
So far so easy, however, the product creation screen has additional important options.
Configuring Product Data

Below the main editor you will find a panel for additional product data. For your shop to work, it is crucial that you fill this in.
First, you need to choose which type of product you are selling from the following options:
- Simple product
- Grouped product
- External/Affiliate product
- Variable product
Depending on what you pick, the configuration options will change. Overall, you can configure these settings:
- Virtual/Physical: If what you’re selling is not a real-life product but software of some sort, check this button. It will also remove the shipping options.
- Downloadable: In addition to that, you can determine whether your product is downloadable, upload the file and add information as well as download conditions.
- General: Give your product a Stock Keeping Unit (unique ID, mandatory), provide product URLs and button text for affiliate products, price and sales price (if applicable) as well as the date range for any upcoming sales. You can also set up whether it’s a taxed product as well as its tax class.
- Inventory: Determine whether the product is in stock and — if it’s a physical product — note down the quantity available and whether you accept backorders.
- Shipping: Weight, dimensions and shipping classes are configured here.
- Linked Products: In this menu you can include related products that will get recommended as up-sells or cross-sells and create product groups.
- Attributes: This is where you define custom product attributes like color, size, etc.
- Variations: When you have set up attributes, this menu allows you to offer variations of your goods.
- Advanced: Here you can add a custom purchase note that will be sent to customers after purchase, change the product order inside the menu and determine whether to allow reviews.
The final step is to fill in the short description at the bottom of the screen. The content entered here will show up under the product title.

When you have set everything up, the finished page will look like this:

Congratulations, you created your first product with WooCommerce and can now access it from the Products menu.
Other Product Settings
The other items in the Products menu are pretty straightforward.
If you have used WordPress before, categories and tags should be second nature to you. The only difference worth mentioning is that in WooCommerce you can add thumbnail images to product categories.
What should also be brought to attention are the other two menus for additional product data named Shipping Classes and Attributes.
The first one allows you to create product groups by shipping and can be used for calculating shipping costs by class.
I already mentioned attributes above and in the corresponding menu you may create sizes, colors and other characteristics that can be added to products as variations.
All clear so far? Then let’s move on to other things.
Managing WooCommerce
From here on out we will look at the menus available under WooCommerce. I’ll explain each and every menu item one by one so you know exactly what’s going on there.
Orders
As you can imagine, this screen shows the current order status of your shop.
If you are strictly dealing in digital products there isn’t much to see here except for how many products you are currently slinging and who bought what.
Physical goods on the other hand can be sent on to shipping and have their order status changed (pending payment, on hold, refunded, failed, etc.).
You can also modify billing or shipping addresses, resend order emails, add notes, change the content of the order and more.

Coupons
This part should also be a familiar concept. Under Coupons you may create and manage discount codes.

Determine the type and amount of discount, set expiration dates, restrict usage (for example, in conjunction with other coupons) and set limits on how many coupons can be used overall or per user.
Easy peasy.
Reports

Here’s where it gets really interesting. In my personal opinion, the report section is one of the highlights of WooCommerce.
The plugin automatically creates detailed summaries on every aspect of your shop. You know what they say, “what gets measured, gets managed” and WooCommerce definitely takes care of the measuring part.
Check gross and net sales of the last seven days and other time frames, view orders placed, items purchased, refunds issued, shipping costs taken in and coupons used–all at a glance.
Yet, it doesn’t stop there. The same overvoew is available for customer sales, product stock and taxes and can be exported in CSV form to import into your own books.
Settings

This section is where you control quite literally every aspect of your WooCommerce online store.
Even the free plugin version offers loads of configuration options and I will go over them briefly to give you a good understanding of WooCommerce’s customization capabilities.
General
- Location Settings: Control the base location of your store, choose the countries you sell to or set to worldwide and create example address details for customers
- Store Notice: Display a site-wide notice text for all customers
- Currency Settings: Set the currency you will be paid in, change the currency format, thousand separator, decimal separator and how many decimals to display after the comma
Products
- General: Change weight and dimension units as well as settings for product reviews, ratings and who can leave them
- Display: Determine the shop page and whether or not to display categories, change the category archive design as well as product order, shopping cart behavior and image dimensions
- Inventory: Enable or disable stock management, how long to hold unpaid orders, notifications for low-running stock and their recipients as well as stock thresholds and inventory display on page
- Downloadable Products: File download delivery method and access restriction for downloadables
Tax
- Tax Options: Enable and disable taxes globally, determine whether to use net or gross prices, configure the calculation method for product and shipping taxes, set up the rounding method, add tax classes, configure the price display in the shop and how to show tax totals
- Standard Rates: Set up different tax rates to use in your shop
- Reduced Rate Rates: Same for reduced rate items
- Zero Rate Rates: Same for tax-free items
Checkout
- Checkout Options: Enable and customize coupons, whether to enable guest checkouts and SSL, configure checkout pages including terms and conditions, define checkout endpoints for processing and available payment gateways
- BACS: Enable and disable bank wire transfers and customize user messages as well as bank connections
- Cheque: Cheque payment options including description and instructions
- Cash on Delivery: Determine whether to accept cash on delivery, for which shipping methods and give instructions for clients paying cash
- PayPal: PayPal payment options, credentials, testing and debugging, advanced options and API settings
- Simplify Commerce: Settings for the Simplify Commerce payment gateway
Shipping
- Shipping Options: Define how to calculate shipping costs, set shipping/billing address as well as shipping locations and methods
- Flat Rate: Configure fixed rate shipping
- Free Shipping: Options and requirements for free shipping
- International Flat Rate: Offer and configure fixed rate shipping for overseas
- Local Delivery: Whether and where to offer local delivery
- Local Pickup: Customers that are eligible for local pickup if at all
Accounts
- Account Options: Determine where users can check their account info, define unique identifiers for different actions on the account page, enable customer registration in different places and whether or not to automatically generate customer user names and passwords
Emails
- Email Options: Determine the recipients and content of different important checkout email notifications, sender names and email addresses and configure the email template (header image, footer text and color scheme)
API
- API Settings — Enable/disable the WooCommerce REST API, set up endpoints and permissions for external applications to access your shop data and create event notifications for integrating third-party services
The post Tutorial: How to Create and Manage Products With WooCommerce appeared first on Web Design Company in Ghana.
]]>